by Sarah K Major
In this age of digital everything, children can usually avoid struggling to read an old-timey analog clock. They can see a display such as 9:15 and glibly read the numbers to you. But do they really understand the meaning behind the pair of numbers, and will they be able to skillfully use time in their daily lives without gaining the meaning behind the number pairs? Using time is a necessary skill, but many children struggle to learn how. Why not make learning to tell time kid friendly by making it into a right brained activity?
Following are some ideas for making learning to tell time a more kid-friendly activity. For the examples, let’s imagine a child named Oliver. Oliver will need to be familiar with counting by 5’s for this clock activity.
Make a clock and a pointer

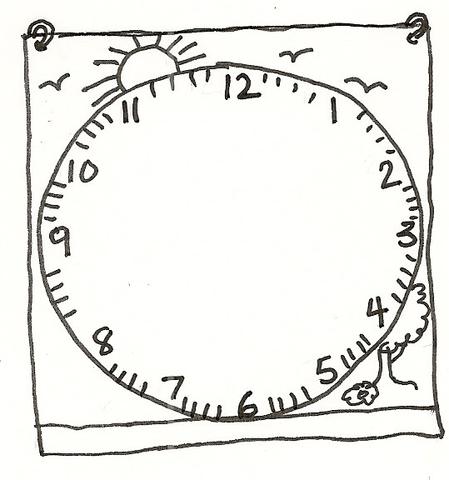
First, find an old sheet or shower curtain and make a huge circle on it with a magic marker as tall as Oliver with his arm reaching above his head. If you hang it on a wall, he should be able to "step inside" the clock (face the clock), with his feet in front of 6, the 12 above his head, his right extended arm pointing to 3 and his left extended arm pointing to 9. Next mark the clock face with the numbers 1-12.
Then, find something to use as a pointer. A wooden dowel would make a great one. You can even get an old knit glove and stuff it lightly so that the pointer has a real pointer finger.
 Practice time-telling terms
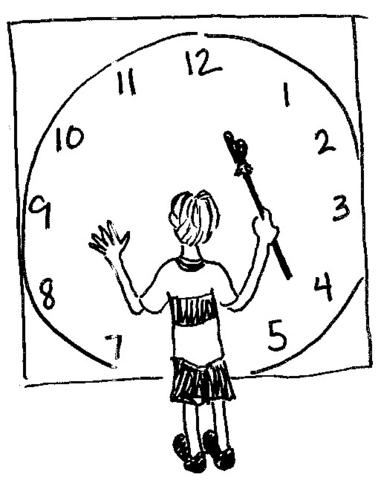
When the giant clock is ready, ask Oliver to "step inside and be the clock" to practice time-telling terms. Oliver will need to hold the pointer in his right hand.
"O'clock" signals the top of the hour, and Oliver will point straight up when he hears that term.
"Quarter after" is the signal for Oliver to reach straight to the right, pointing at the 3.
"Quarter ‘til" will prompt him to point to the 9.
"…thirty" means bending over and reaching for his toes.
 Practice counting by 5’s around the clock face
Before mixing it all up, have Oliver practice counting by 5’s around the clock face. Each set of 5 minutes will be marked by a large number. Be sure he understands that each time he touches a big number as he progresses around the clock face, 5 more minutes have passed.
Practice minutes after and minutes ‘til
After Oliver has practiced counting by 5’s, it is time to practice minutes before and minutes after. Tell Oliver to step into the clock again with his pointer in his right hand and get ready to play. Prompt him to move his arm to point to the minute you specify as you play the game.
To begin, say, "5 minutes after" and prompt Oliver to extend his right arm to the 1. Next say, "5 minutes 'til" and prompt him to move the equal distance from o’clock on the left side of the clock using his pointer.
Then say, "10 after" and let Oliver point to the 2. "10 'til" will be a mirror of "10 after" on the left side of the clock.
Continue systematically saying the number pairs in this way until he is familiar with where the various numbers are in relationship to o’clock, quarter after and 30 after.
After practicing doing the minutes before and after in order, try mixing it up a little by asking for 15 before and after, then 25 before and after, etc. By pointing to the pairs of numbers in a random order, Oliver will begin to relate the number pairs on the clock:
1 and 11
2 and 10
3 and 9
4 and 8
5 and 7
In addition, what will be happening as he practices finding these pairs of numbers is that the movements will be stored in his body as Oliver stretches to point to various minutes. Some minutes will be easy to reach, while other minutes will require him to stretch around quite a bit.
Practice telling time
Once Oliver has become very familiar and fluent with minutes before and after and can readily find the minutes you ask him for, move to reading the clock whole body. Oliver will use his pointing stick in his right hand to represent the minute hand. The hour hand will be Oliver’s left arm without a pointer. Make sure Oliver relates his long pointing arm to the longer minute hand on an analog clock and his left arm, of course, to the shorter hour hand on the analog clock. When you say "10 minutes after 9" Oliver will use his right arm to point to the minutes and then will identify the hour (9) with his left hand. Continue calling out times for Oliver using the same terms until he’s very familiar with finding those times on the clock.
Practice quarters
Make a clock face with construction paper in Oliver’s favorite color. Next make another same-size circle in a new color and fold twice, horizontally and vertically. Cut the second circle on the fold lines so that you have four quarters. Give these quarters to Oliver and teach him that when you say "quarter after," he can place the first cut-out quarter so that it lines up with the o’clock and the 3. If you say "half past" or "30," Oliver will place another quarter next to the first one. Now the right side of the clock is covered with 2 quarters. If you say "45 after," Oliver will place the third quarter next to the last one so that the entire clock is covered except for the space between the 9 and the 12. Doing this tactile, visual activity will help Oliver understand that 45 after and 15 'til are the same spot on the clock. Use the whole body clock to practice quarter after, thirty, and 45 after, and finally quarter ‘til.
Relate the analog clock to a digital version
To complete this activity, use 3" x 5" cards with digital times written on them with a big marker (such as 6:10, 3:50, etc.) On the backs of the cards, simply write the hour as an o’clock. For example, on one side of the card you will write the specific time with minutes included: 6:10. On the back of that same card, write just the hour: 6:00. Continue making a nice stack of cards in the same fashion. Now, ask Oliver to step up to the whole body clock. Show him the o’clock side of the card first. For example, show him the card that says 6:00. He will locate the 6 with his left arm and show o’clock with his pointer. Next, flip the card over to show 6:10. His left hand will stay on the 6, but his right, minute-hand-pointer arm which has been pointing straight up while waiting will then swoop down to point to 10 minutes after.
The absolute key for success with this whole body learning activity is to teach in comfortable increments, allowing for plenty of time for Oliver to gain fluency with each step before moving on to the next. Remember that we are relying on the body to learn and remember, and it takes practice to learn and gain fluency with a physical activity.
Sarah Major, CEO of Child1st Publications, grew up on the mission field with her four siblings, all of whom her mother homeschooled. As an adult, Sarah has homeschooled a small group of children in collaboration with their parents, and has taught from preschool age to adult. Sarah has been the Title 1 director and program developer for grades K-7, an ESOL teacher, and a classroom teacher. As an undergraduate student, Sarah attended Wheaton College in Wheaton, Ill. and then received her M.Ed. from Aquinas College in Grand Rapids, MI. In 2006 Sarah resigned from fulltime teaching in order to devote more time to Child1st, publisher of the best-selling SnapWords™ stylized sight word cards. In her spare time Sarah enjoys gardening, cooking, pottery, quilting, and spending time with her family.
Child1st Publications, LLC
www.child1st.com
800-881-0912
In this age of digital everything, children can usually avoid struggling to read an old-timey analog clock. They can see a display such as 9:15 and glibly read the numbers to you. But do they really understand the meaning behind the pair of numbers, and will they be able to skillfully use time in their daily lives without gaining the meaning behind the number pairs? Using time is a necessary skill, but many children struggle to learn how. Why not make learning to tell time kid friendly by making it into a right brained activity?
Following are some ideas for making learning to tell time a more kid-friendly activity. For the examples, let’s imagine a child named Oliver. Oliver will need to be familiar with counting by 5’s for this clock activity.
Make a clock and a pointer

First, find an old sheet or shower curtain and make a huge circle on it with a magic marker as tall as Oliver with his arm reaching above his head. If you hang it on a wall, he should be able to "step inside" the clock (face the clock), with his feet in front of 6, the 12 above his head, his right extended arm pointing to 3 and his left extended arm pointing to 9. Next mark the clock face with the numbers 1-12.
Then, find something to use as a pointer. A wooden dowel would make a great one. You can even get an old knit glove and stuff it lightly so that the pointer has a real pointer finger.

When the giant clock is ready, ask Oliver to "step inside and be the clock" to practice time-telling terms. Oliver will need to hold the pointer in his right hand.
"O'clock" signals the top of the hour, and Oliver will point straight up when he hears that term.
"Quarter after" is the signal for Oliver to reach straight to the right, pointing at the 3.
"Quarter ‘til" will prompt him to point to the 9.
"…thirty" means bending over and reaching for his toes.

Before mixing it all up, have Oliver practice counting by 5’s around the clock face. Each set of 5 minutes will be marked by a large number. Be sure he understands that each time he touches a big number as he progresses around the clock face, 5 more minutes have passed.
Practice minutes after and minutes ‘til
After Oliver has practiced counting by 5’s, it is time to practice minutes before and minutes after. Tell Oliver to step into the clock again with his pointer in his right hand and get ready to play. Prompt him to move his arm to point to the minute you specify as you play the game.
To begin, say, "5 minutes after" and prompt Oliver to extend his right arm to the 1. Next say, "5 minutes 'til" and prompt him to move the equal distance from o’clock on the left side of the clock using his pointer.
Then say, "10 after" and let Oliver point to the 2. "10 'til" will be a mirror of "10 after" on the left side of the clock.
Continue systematically saying the number pairs in this way until he is familiar with where the various numbers are in relationship to o’clock, quarter after and 30 after.
After practicing doing the minutes before and after in order, try mixing it up a little by asking for 15 before and after, then 25 before and after, etc. By pointing to the pairs of numbers in a random order, Oliver will begin to relate the number pairs on the clock:
1 and 11
2 and 10
3 and 9
4 and 8
5 and 7
In addition, what will be happening as he practices finding these pairs of numbers is that the movements will be stored in his body as Oliver stretches to point to various minutes. Some minutes will be easy to reach, while other minutes will require him to stretch around quite a bit.
Practice telling time
Once Oliver has become very familiar and fluent with minutes before and after and can readily find the minutes you ask him for, move to reading the clock whole body. Oliver will use his pointing stick in his right hand to represent the minute hand. The hour hand will be Oliver’s left arm without a pointer. Make sure Oliver relates his long pointing arm to the longer minute hand on an analog clock and his left arm, of course, to the shorter hour hand on the analog clock. When you say "10 minutes after 9" Oliver will use his right arm to point to the minutes and then will identify the hour (9) with his left hand. Continue calling out times for Oliver using the same terms until he’s very familiar with finding those times on the clock.
Practice quarters
Make a clock face with construction paper in Oliver’s favorite color. Next make another same-size circle in a new color and fold twice, horizontally and vertically. Cut the second circle on the fold lines so that you have four quarters. Give these quarters to Oliver and teach him that when you say "quarter after," he can place the first cut-out quarter so that it lines up with the o’clock and the 3. If you say "half past" or "30," Oliver will place another quarter next to the first one. Now the right side of the clock is covered with 2 quarters. If you say "45 after," Oliver will place the third quarter next to the last one so that the entire clock is covered except for the space between the 9 and the 12. Doing this tactile, visual activity will help Oliver understand that 45 after and 15 'til are the same spot on the clock. Use the whole body clock to practice quarter after, thirty, and 45 after, and finally quarter ‘til.
Relate the analog clock to a digital version
To complete this activity, use 3" x 5" cards with digital times written on them with a big marker (such as 6:10, 3:50, etc.) On the backs of the cards, simply write the hour as an o’clock. For example, on one side of the card you will write the specific time with minutes included: 6:10. On the back of that same card, write just the hour: 6:00. Continue making a nice stack of cards in the same fashion. Now, ask Oliver to step up to the whole body clock. Show him the o’clock side of the card first. For example, show him the card that says 6:00. He will locate the 6 with his left arm and show o’clock with his pointer. Next, flip the card over to show 6:10. His left hand will stay on the 6, but his right, minute-hand-pointer arm which has been pointing straight up while waiting will then swoop down to point to 10 minutes after.
The absolute key for success with this whole body learning activity is to teach in comfortable increments, allowing for plenty of time for Oliver to gain fluency with each step before moving on to the next. Remember that we are relying on the body to learn and remember, and it takes practice to learn and gain fluency with a physical activity.
Sarah Major, CEO of Child1st Publications, grew up on the mission field with her four siblings, all of whom her mother homeschooled. As an adult, Sarah has homeschooled a small group of children in collaboration with their parents, and has taught from preschool age to adult. Sarah has been the Title 1 director and program developer for grades K-7, an ESOL teacher, and a classroom teacher. As an undergraduate student, Sarah attended Wheaton College in Wheaton, Ill. and then received her M.Ed. from Aquinas College in Grand Rapids, MI. In 2006 Sarah resigned from fulltime teaching in order to devote more time to Child1st, publisher of the best-selling SnapWords™ stylized sight word cards. In her spare time Sarah enjoys gardening, cooking, pottery, quilting, and spending time with her family.
Child1st Publications, LLC
www.child1st.com
800-881-0912


